
| 일 | 월 | 화 | 수 | 목 | 금 | 토 |
|---|---|---|---|---|---|---|
| 1 | 2 | 3 | 4 | |||
| 5 | 6 | 7 | 8 | 9 | 10 | 11 |
| 12 | 13 | 14 | 15 | 16 | 17 | 18 |
| 19 | 20 | 21 | 22 | 23 | 24 | 25 |
| 26 | 27 | 28 | 29 | 30 | 31 |
- TestCode
- ORM
- 컴퓨터 구조
- restTemplate
- 자료구조
- 백엔드
- 백엔드공부
- 제로베이스
- spring
- JPA
- queue
- 서버
- array
- 컴퓨터 공학
- LinkedList
- QueryDSL
- SpringBoot
- 프로그래머스
- 백준
- 스프링부트
- SpringSecurity
- 백엔드스쿨
- error
- spring boot
- 개발자
- 연관관계
- Java
- 핵심가이드
- actuator
- JWT
- Today
- Total
be_better
[Springboot] 서버 간 통신 - RestTemplate 사용해보기 본문

목차
RestTemplate 사용하기
서버 프로젝트 생성
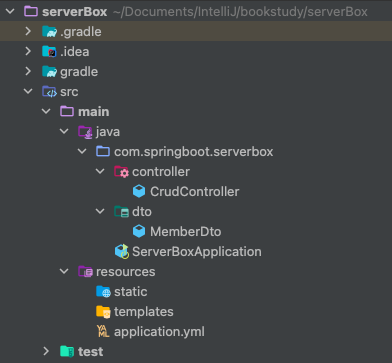
두 개의 서버를 가동시켜야 하기 때문에 톰캣의 포트를 변경해준다.
application.yml
server:
  port: 9090
MemberDto 클래스
@Getter
@Setter
@NoArgsConstructor
@AllArgsConstructor
@Builder
public class MemberDto {
    private String name;
    private String email;
    private String organization;

    public String toString() {
        return "MemberDto{" +
                "name='" + this.getName() + "\'" +
                ", email='" + this.getEmail() + "\'" +
                ", organization='" + this.getOrganization() + "\'" +
                "}";
    }
}
CrudController 클래스
@RestController
@RequestMapping("/api/v1/crud-api")
public class CrudController {

    @GetMapping
    public String getName() {
        return "jnjeaaaat";
    }

    @GetMapping("/{variable}")
    public String getVariable(@PathVariable String variable) {
        return variable;
    }

    @GetMapping("/param")
    public String getNameWithParam(@RequestParam String name) {
        return "Hello. " + name + "!";
    }

    @PostMapping
    public ResponseEntity<MemberDto> getMember(
            @RequestBody MemberDto request,
            @RequestParam String name,
            @RequestParam String email,
            @RequestParam String organization) {

        System.out.println(request.getName());
        System.out.println(request.getEmail());
        System.out.println(request.getOrganization());

        MemberDto memberDto = new MemberDto();
        memberDto.setName(name);
        memberDto.setEmail(email);
        memberDto.setOrganization(organization);

        return ResponseEntity.status(HttpStatus.OK).body(memberDto);

    }

    @PostMapping("/add-header")
    public ResponseEntity<MemberDto> addHeader(@RequestHeader("my-header") String header,
                                               @RequestBody MemberDto memberDto) {

        System.out.println(header);

        return ResponseEntity.status(HttpStatus.OK).body(memberDto);

    }
}
RestTemplate 구현하기
일반적으로 RestTemplate은 별도의 유틸리티 클래스로 생성하거나 서비스 또는 비즈니스 계층에 구현된다. 앞서 생성한 서버 프로젝트에 요청을 날리기 위해 서버의 역할을 수행하면서 다른 서버로 요청을 보내는 클라이언트의 역할도 수행하는 새로운 모듈을 추가한다.
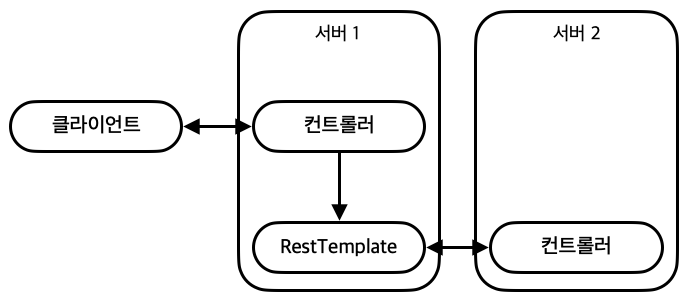
RestTemplate은 이미 spring-boot-starter-web 모듈에 포함되어 있는 기능이므로 build.gradle에 별도로 의존성을 추가할 필요는 없다.
GET 형식의 RestTemplate 작성하기
RestTemplateService의 GET 예제
@Service
public class RestTemplateService {

    public String getName() {
        URI uri = UriComponentsBuilder
                .fromUriString("http://localhost:9090")
                .path("/api/v1/curd-api")
                .encode()
                .build()
                .toUri();

        RestTemplate restTemplate = new RestTemplate();
        ResponseEntity<String> responseEntity = restTemplate.getForEntity(uri, String.class);

        return responseEntity.getBody();
    }

    public String getNameWithPathVariable() {
        URI uri = UriComponentsBuilder
                .fromUriString("http://localhost:9090")
                .path("/api/v1/curd-api/{name}")
                .encode()
                .build()
                .expand("Jnjeaaaat") // 여러개의 값을 넣어야할 경우 , 를 추가해서 구분
                .toUri();

        RestTemplate restTemplate = new RestTemplate();
        ResponseEntity<String> responseEntity = restTemplate.getForEntity(uri, String.class);

        return responseEntity.getBody();
    }

    public String getNameWithParameter() {
        URI uri = UriComponentsBuilder
                .fromUriString("http://localhost:9090")
                .path("/api/v1/curd-api/param")
                .queryParam("name", "Jnjeaaaat")
                .encode()
                .build()
                .toUri();

        RestTemplate restTemplate = new RestTemplate();
        ResponseEntity<String> responseEntity = restTemplate.getForEntity(uri, String.class);

        return responseEntity.getBody();
    }

}
RestTemplate을 생성하고 사용하는 방법은 아주 다양하지만, 가장 보편적인 방법은 UriComponents Builder를 사용하는 방법이다.
UriComponentsBuilder는 스프링 프레임워크에서 제공하는 클래스로서 여러 파라미터를 연결해서 URI 형식으로 만드는 기능을 수행한다.
UriComponentsBuilder는 빌더 형식으로 객체를 생성한다. fromUriString() 메서드에서는 호출부의 URL을 입력하고, 이어서 path() 메서드에 세부 경로를 입력한다. encode() 메서드는 인코딩 문자셋을 설정할 수 있는데, 인자를 전달하지 않으면 기본적으로 UTF-8로 코드가 실행된다.
public final UriComponentsBuilder encode() {
   return encode(StandardCharsets.UTF_8);
}
이후 build() 메서드를 통해 빌더 생성 종료하고 UriComponents 타입 리턴.
toUri()메서드를 통해 URI 타입으로 리턴하지 않는다면 toUriString() 메서드로 대체해서 사용하면 된다.
이렇게 생성된 uri는 restTemplate이 외부 API를 요청하는 데 사용되며, getForEntity()에 파라미터로 전달된다. getForEntity()는 URI와 응답받는 타입을 매개변수로 사용한다.
path() 메서드 내에 입력한 세부 URI 중 중괄호({}) 부분을 사용해 개발 단계에서 쉽게 이해할 수 있는 변수명을 입력.
expand() 메서드에서는 순서대로 값을 입력하는데 여러 개의 값을 넣어야 하는 경우 콤마(,)로 구분해서 나열한다.
queryParam() 메서드는 (키, 값) 형식으로 파라미터를 추가할 수 있다.
POST 형식의 RestTemplate 작성
public ResponseEntity<MemberDto> postWithParamAndBody() {
    URI uri = UriComponentsBuilder
            .fromUriString("http://localhost:9090")
            .path("/api/v1/curd-api")
            .queryParam("name", "Jnjeaaaat")
            .queryParam("email", "ekswn120@gmail.com")
            .queryParam("organization", "Free")
            .encode()
            .build()
            .toUri();

    MemberDto memberDto = new MemberDto();
    memberDto.setName("jnjeaaaat");
    memberDto.setEmail("ekswn120@gmail.com");
    memberDto.setOrganization("Around Hub Studio");

    RestTemplate restTemplate = new RestTemplate();
    ResponseEntity<MemberDto> responseEntity =
            restTemplate.postForEntity(uri, memberDto, MemberDto.class);

    return responseEntity;
}

public ResponseEntity<MemberDto> postWithHeader() {
    URI uri = UriComponentsBuilder
            .fromUriString("http://localhost:9090")
            .path("/api/v1/curd-api/add-header")
            .encode()
            .build()
            .toUri();

    MemberDto memberDto = new MemberDto();
    memberDto.setName("jnjeaaaat");
    memberDto.setEmail("ekswn120@gmail.com");
    memberDto.setOrganization("Around Hub Studio");

    RequestEntity<MemberDto> requestEntity = RequestEntity
            .post(uri)
            .header("my-header", "Wikibooks API")
            .body(memberDto);

    RestTemplate restTemplate = new RestTemplate();
    ResponseEntity<MemberDto> responseEntity =
            restTemplate.exchange(requestEntity, MemberDto.class);

    return responseEntity;
}
먼저 RequestBody에 값을 담기 위해서는 데이터 객체를 생성하고 postForEntity() 메서드를 사용해 파라미터로 데이터 객체를 넣으면 된다.
postForEntity() 메서드로 서버 프로젝트의 API를 호출하면 서버 프로젝트의 콘솔 로그에는 RequestBody 값이 출력되고 파라미터 값은 결과값으로 리턴된다.
컨트롤러 작성
@RestController
@RequestMapping("/rest-template")
public class RestTemplateController {

    private final RestTemplateService restTemplateService;

    public RestTemplateController(RestTemplateService restTemplateService) {
        this.restTemplateService = restTemplateService;
    }

    @GetMapping
    public String getName() {
        return restTemplateService.getName();
    }

    @GetMapping("/path-variable")
    public String getNameWithPathVariable() {
        return restTemplateService.getNameWithPathVariable();
    }

    @GetMapping("/parameter")
    public String getNameWithParameter() {
        return restTemplateService.getNameWithParameter();
    }

    @PostMapping
    public ResponseEntity<MemberDto> postDto() {
        return restTemplateService.postWithParamAndBody();
    }

    @PostMapping
    public ResponseEntity<MemberDto> postWithHeader() {
        return restTemplateService.postWithHeader();
    }
}
RestTemplate 커스텀 설정
RestTemplate은 HTTPClient를 추상화하고 있다. HttpClient의 종류에 따라 기능에 차이가 다소 있는데, 가장 큰 차이는 커넥션 풀(Connection Pool)이다.
RestTemplate은 기본적으로 커넥션 풀을 지원하지 않고 매번 호출할 때 마다 포트를 열어 커넥션을 생성하게 되는데, TIME_WAIT 상태가 된 소켓을 다시 사용하려고 접근한다면 재사용하지 못하게 된다. 이를 방지하기 위해서는 커넥션 풀 기능을 활성화해서 재사용할 수 있게 하는 것이 좋다.
이 기능을 활성화하는 가장 대표적인 방법은 아파치에서 제공하는 HttpClient로 대체해서 사용하는 방식이다.
httpClient 의존성 추가
// gradle
dependencies {
  implementation 'org.apache.httpcomponents:httpclient'
}

// maven
<dependencies>
  <dependency>
    <groupId>org.apache.httpcomponents</groupId>
    <artifactId>httpclient</artifactId>
  </dependency>
</dependencies>
의존성을 추가하면 RestTemplate의 설정을 더욱 쉽게 추가하고 변경할 수 있다.
커스텀 RestTemplate 객체 생성 메서드
public RestTemplate restTemplate() {
    HttpComponentsClientHttpRequestFactory factory = new HttpComponentsClientHttpRequestFactory();

    HttpClient client = HttpClientBuilder.create()
            .setMaxConnTotal(500)
            .setMaxConnPerRoute(500)
            .build();

    CloseableHttpClient httpClient = HttpClients.custom()
            .setMaxConnTotal(500)
            .setMaxConnPerRoute(500)
            .build();

    factory.setHttpClient(httpClient);
    factory.setConnectTimeout(2000);
    factory.setReadTimeout(5000);

    RestTemplate restTemplate = new RestTemplate(factory);

    return restTemplate;
}
RestTemplate의 생성자
public RestTemplate(ClientHttpRequestFactory requestFactory) {
   this();
   setRequestFactory(requestFactory);
}
ClientHttpRequestFactory는 함수형 인터페이스로,
대표적인 구현체로서 SimpleClientHttpRequestFactory와 HttpComponentsClientHttpRequestFactory가 있다.
별도의 구현체를 설정해서 전달하지 않으면 HttpAccessor에 구현되어 있는 내용에 의해 SimpleClientHttpRequestFactory를 사용하게 된다.
별도의 HttpComponentsClientHttpRequestFactory 객체를 생성해서 ClientHttpRequestFactory를 사용하면 RestTemplate의 Timeout을 설정할 수 있다.
HttpComponentsClientHttpRequestFactory는 커넥션 풀을 설정하기 위해
HttpClient를 HttpComponentsClientHttpRequestFactory에 설정할 수 있다.
HttpClient를 생성하는 방법은 두 가지로 HttpClientBuilder.create() 메서드를 사용하거나 HttpClients.custom() 메서드를 사용하는 것이다.
생성한 HttpClient는 factory의 setHttpClient() 메서드를 통해 인자로 전달해서 설정할 수 있다. 이렇게 설정된 factory 객체를 RestTemplate을 초기화하는 과정에서 인자로 전달하면 된다.
'Springboot > 이론' 카테고리의 다른 글
| [Springboot] 서비스의 인증과 권한 부여 - SpringSecurity 소개 (0) | 2023.12.06 |
|---|---|
| [Springboot] 서버 간 통신 - WebClient (0) | 2023.11.29 |
| [Springboot] 서버 간 통신 - RestTemplate 소개 (0) | 2023.11.29 |
| [Springboot] 액추에이터 활용하기 - 커스텀 (0) | 2023.11.29 |
| [Springboot] 액추에이터 활용하기 - 액추에이터 기능 (0) | 2023.11.29 |


